Setting up payment type methods
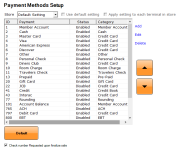
- Select Tools | Options | Sales Options | Payment Methods you set up new payment type for which you can finalize a transaction. The Payment Method screen displays:
Note: You can also edit or delete a payment type by selecting a payment type then clicking Edit or Delete.
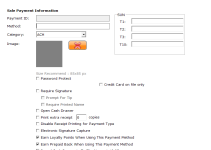
- Select Add to the right of the box to add a new payment type. The Sale Payment Information screen displays.
- Enter what kind of payment this is in the Method field. You can be descriptive.
- From the Sales Category drop-down list, select the category for this type of payment.
Note: The categories found in the drop-down list are created in the Sales Category screen found under Reference Tables; this determines how the payment process will handle custom payment methods. For example, if you create a payment method called "Play Money" and set it to the Credit Card category, when finalizing the sale, you select the "Play Money" payment method, the software will prompt with the credit card type screens and expect a card to be swiped.
- If you'd like to add an image to display when selecting this payment type during the finalizing of a payment, select the [x], and navigate your hard drive to select the image.
- To protect this method of payment, select the Password Protect checkbox.
- Select the Credit Card on file only checkbox if this payment method is going to be using only credit cards that are on file, that is entered in the system.
- To have a prompt display for a tip, select the Prompt for Tip checkbox.
- To have the customer print their name in addition to a signature, select the Required Printed Name checkbox.
- To have your cash drawer open after this payment type process, select the Open Cash Drawer checkbox.
- If you'd like extra receipts printed, select the Print extra receipt checkbox then enter the number you'd like to print in the field to the right.
- Select the Disable Receipt Printing for Payment Type checkbox to stop any receipts from printing when using this payment type method.
- Select the Electronic Signature Capture checkbox if you are accepting signatures through an electronic device, such as iPad or computer.
- Select the Earn LoyaltyPoints When Using This Payment Method checkbox allows the customer/member to accrue Loyalty Points.
- Select the Earn Prepaid Back When Using This Payment Method checkbox allows the customer to get pre-paid credits to their account.
Example: If you turn the prepaid back checkbox on cash for example, a customer can purchase a prepaid cash back eligible item and when using the cash payment method, they will get pre-paid credits to their account.
- Select the Round Cash Payments To the Nearest $0.05 checkbox to round the payment up automatically to the nearest five cents when paying with cash only.
- You may need to scroll down to click Save at the bottom of this screen.
- Then click Save again in the bottom-right corner. As always, you need to exit Options completely and may have to exit POS Express and start it up again before the changes take place.

